Quick Links
Consistently taking good smartphone photos in varying lighting conditions is very challenging. Even worse, not all techniques are easily transferable across different scenarios. But a handful are, and today, I’ll share how I take good smartphone pictures in any lighting condition.
1Making the Most of Shadows
Knowing how to use shadows in your photos will make a huge difference in the results you get. One of my favorite ways to utilize shadows is by capturing a silhouette of a person or building; this works particularly well whentaking smartphone photos in harsh lighting.
I also like using shadows to create interesting effects. While I used to be impatient and hit the shutter straight away, I’ll now wait for someone to walk into a light area when they emerge from a shadow. You can also use shadows to show sharp contrasts in buildings.
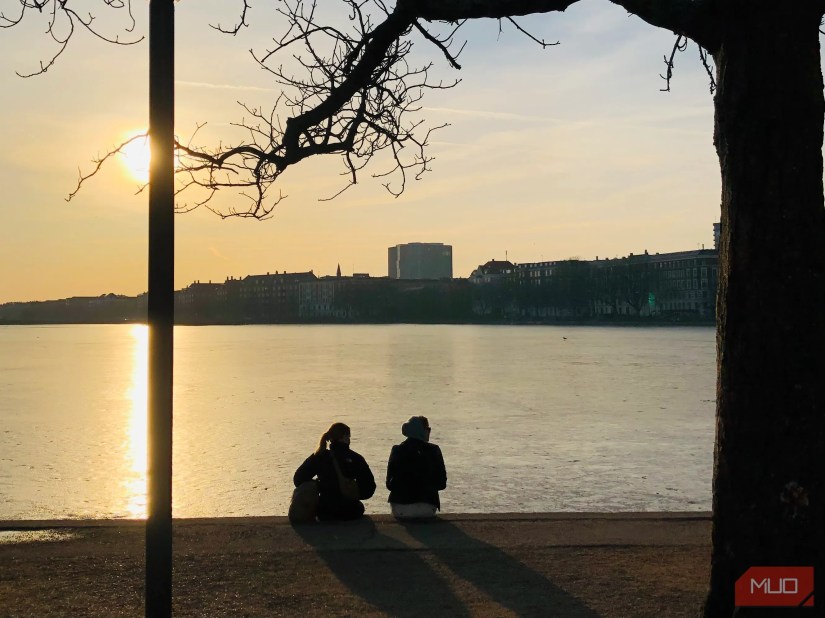
When you take photos on your smartphone, I don’t recommend keeping the main subject within the shadows; it’s often much harder for the viewer to know in which direction they should look.
2Understanding When to Overexpose and Underexpose
Having been a photographer for over seven years, I can happily tell you that it’s sometimes worth breaking the rules with overexposure and underexposure. Most of the images you dislike will be due to accidentally going too high or low on the exposure, but you can get some excellent results if you approach it experimentally.
Underexposing images is useful if you later want to edit them, and I also like underexposing my pictures if I want them to look moody. On particularly bright days, I move the meter down so that the final result doesn’t look too harsh. It’s normally quite easy tofix underexposed images on iPhone and Android, so you shouldn’t worry if you accidentally go too far down.

On the other hand, I think that overexposing works well in snowy conditions when it’s already bright. Sometimes, I’ll also overexpose my skies on sunny days; doing so will make it even more obvious how much natural lighting there is. You just need to be careful not to blow out all your picture’s details.
3Sticking to a Handful of Smartphone Photography Tricks
As you become more advanced in your photography andevolve and find your photography style, a couple of tricks and composition types will naturally attract your attention and become your go-to. I take some of my best photos when keeping things simple and using the same techniques that have worked for me in the past.
To this day,the rule of thirdsis still one of my go-to composition styles. In simple terms, you’ll divide your picture into three sections, and each should form a crucial part of the story you’re trying to tell. I find that the rule of thirds works particularly well when taking street-style photos or pictures of products.

Leading lines are another way toget the perfect composition in your smartphone pictures. Here, you use a line—such as a road or river—to show viewers where they should focus their attention. Also worth considering is the rule of having a foreground, middle, and background; I use this whenshooting landscape photography on my phone.
It’s also worth considering somesmartphone photography tips and tricks, but only when doing so makes sense. For example, you’re able to capture reflections and point your camera upwards for unique perspectives, regardless of the lighting conditions.

4Knowing When to Use Each Camera Mode
Since I have an iPhone, my camera has different modes. At first, I always used Portrait Mode because I thought it would lead to the sharpest results. However, this is not true.
Portrait Mode is great for taking pictures of people and things, especially when you’re already close to them physically. However, it’s not the best option for landscapes; in these instances, the standard camera mode works just fine.

I also think about when to use different filters in different lighting conditions and apply them as needed. This will take some time to experiment with, but I strongly recommend doing so.
5Editing My Camera Settings in Advance
While your smartphone will have a default mode for taking pictures, you don’t need to keep your settings the same way that they come. If your device lets you adjust your phone and video settings, I strongly suggest doing so.
Turning on the grid is a very good idea for composition, and most phone cameras will offer access to this. You should also consider switching on lens correction if you have this option.
Make sure that youadjust your iPhone camera settingsorGoogle Pixel camera settingsbefore photographing for better results in any lighting condition.
6Using Third-Party Camera Apps
I still remember the early 2010s when taking photos on a smartphone was, by and large, useless. But while they’re no longer akin to potatoes, smartphone cameras still have their limitations.
Fortunately, you canuse numerous third-party camera appsto give your camera more capabilities than it otherwise would have. For example, if you want to take vintage-style pictures, consider downloading an app like 1998Cam, while apps like ProCam will let you adjust the ISO.
Some apps require a paid subscription or a one-time purchase, but you can access several for free.
7Analyzing My Old Photos by Turning On Live Photos
Looking at your old photos and critically analyzing them is a fantastic way to get better pictures in the future. Depending on your device, you might be able to switch on Live Photos or something similar. Doing so is a great way to see what you were doing before capturing an image.
When analyzing your live photos, look at how you set up your camera, what the lighting conditions were like, and whether anything else contributed to a good or bad photo.
Switching on Live Photoswill consume more storage and decrease your battery percentage faster, but it’s worth doing if you see an improvement in your photography. You should also learnhow to get better Live Photos on your phone.
Good photos aren’t light-specific, and anyone who tells you otherwise is projecting their own limiting beliefs. you’re able to capture amazing smartphone pictures in all kinds of conditions if you’ve got some go-to techniques and know how to use each camera mode. Adjusting your camera settings in advance will also go a long way.
